单元格
RichTextRun 定义了富文本的属性。
type RichTextRun struct {
    Font *Font
    Text string
}
HyperlinkOpts 用来指定可选的超链接属性,例如要显示的文字与屏幕提示文字。
type HyperlinkOpts struct {
    Display *string
    Tooltip *string
}
FormulaOpts 用于在 SetCellFormula 函数中指定设置特殊公式类型。
type FormulaOpts struct {
    Type *string // 公式类型
    Ref  *string // 共享公式引用
}
设置单元格的值
func (f *File) SetCellValue(sheet, cell string, value interface{}) error
根据给定的工作表名和单元格坐标设置单元格的值。此功能是并发安全的。指定的坐标不应在表格的第一行范围,使用字符文本设置复数。
| 支持的数据类型 |
|---|
| int |
| int8 |
| int16 |
| int32 |
| int64 |
| uint |
| uint8 |
| uint16 |
| uint32 |
| uint64 |
| float32 |
| float64 |
| string |
| []byte |
| time.Duration |
| time.Time |
| bool |
| nil |
请注意,此函数默认为 time.Time 类型的单元格的值设置 m/d/yy h:mm 数字格式,您可通过 SetCellStyle 更改该设置。若您需设置无法通过 Go 语言 time.Time 类型表示的 Excel 特殊日期,例如 1900 年 1 月 0 日或 1900 年 2 月 29 日,请先设置单元格的值为 0 或 60,再为其设置具有日期数字格式的样式。
设置布尔型值
func (f *File) SetCellBool(sheet, cell string, value bool) error
根据给定的工作表名和单元格坐标设置布尔型单元格的值。
设置默认字符型值
func (f *File) SetCellDefault(sheet, cell, value string) error
根据给定的工作表名和单元格坐标设置字符型单元格的值,字符将不会进行特殊字符过滤。
设置整数
func (f *File) SetCellInt(sheet, cell string, value int) error
根据给定的工作表名和单元格坐标设置整数型单元格的值。
设置浮点数
func (f *File) SetCellFloat(sheet, cell string, value float64, precision, bitSize int) error
根据给定的工作表名、单元格坐标、浮点数、浮点数尾数部分精度和浮点数类型设置浮点型单元格的值。
设置字符型值
func (f *File) SetCellStr(sheet, cell, value string) error
根据给定的工作表名和单元格坐标设置字符型单元格的值,字符将会进行特殊字符过滤,并且字符串的累计长度应不超过 32767,多余的字符将会被忽略。
设置单元格样式
func (f *File) SetCellStyle(sheet, hCell, vCell string, styleID int) error
根据给定的工作表名、单元格坐标区域和样式索引设置单元格的值。此功能是并发安全的。样式索引可以通过 NewStyle 函数获取。注意,在同一个坐标区域内的 diagonalDown 和 diagonalUp 需要保持颜色一致。SetCellStyle 将覆盖单元格的已有样式,而不会将样式与已有样式叠加或合并。
- 例1,为名为
Sheet1的工作表D7单元格设置边框样式:
style, err := f.NewStyle(&excelize.Style{
    Border: []excelize.Border{
        {Type: "left", Color: "0000FF", Style: 3},
        {Type: "top", Color: "00FF00", Style: 4},
        {Type: "bottom", Color: "FFFF00", Style: 5},
        {Type: "right", Color: "FF0000", Style: 6},
        {Type: "diagonalDown", Color: "A020F0", Style: 8},
        {Type: "diagonalUp", Color: "A020F0", Style: 8},
    },
})
if err != nil {
    fmt.Println(err)
}
err = f.SetCellStyle("Sheet1", "D7", "D7", style)
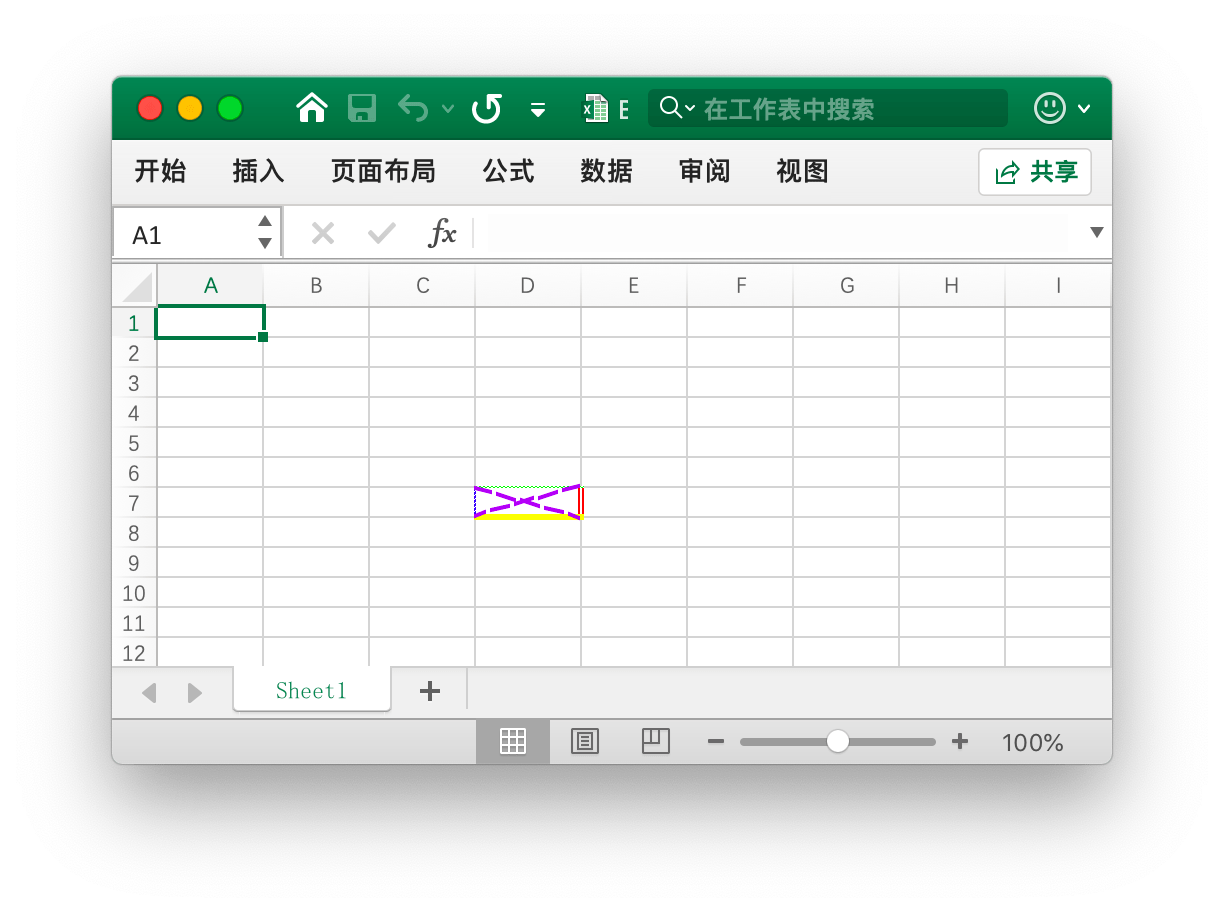
单元格 D7 的四个边框被设置了不同的样式和颜色,这与调用 NewStyle 函数时的参数有关,需要设置不同的样式可参考该章节的文档。
- 例2,为名为
Sheet1的工作表D7单元格设置渐变样式:
style, err := f.NewStyle(&excelize.Style{
    Fill: excelize.Fill{Type: "gradient", Color: []string{"FFFFFF", "E0EBF5"}, Shading: 1},
})
if err != nil {
    fmt.Println(err)
}
err = f.SetCellStyle("Sheet1", "D7", "D7", style)

单元格 D7 被设置了渐变效果的颜色填充,渐变填充效果与调用 NewStyle 函数时的参数有关,需要设置不同的样式可参考该章节的文档。
- 例3,为名为
Sheet1的工作表D7单元格设置纯色填充:
style, err := f.NewStyle(&excelize.Style{
    Fill: excelize.Fill{Type: "pattern", Color: []string{"E0EBF5"}, Pattern: 1},
})
if err != nil {
    fmt.Println(err)
}
err = f.SetCellStyle("Sheet1", "D7", "D7", style)
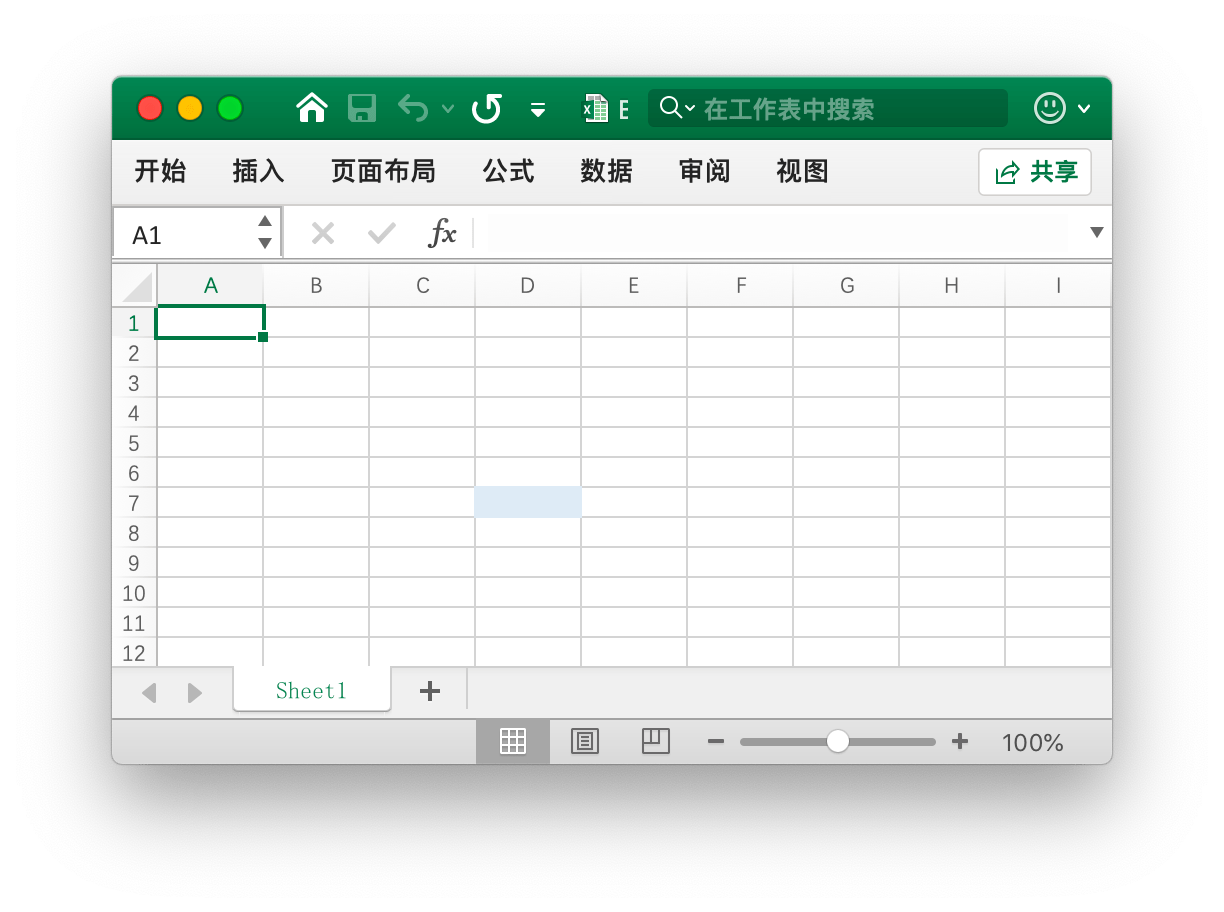
单元格 D7 被设置了纯色填充。
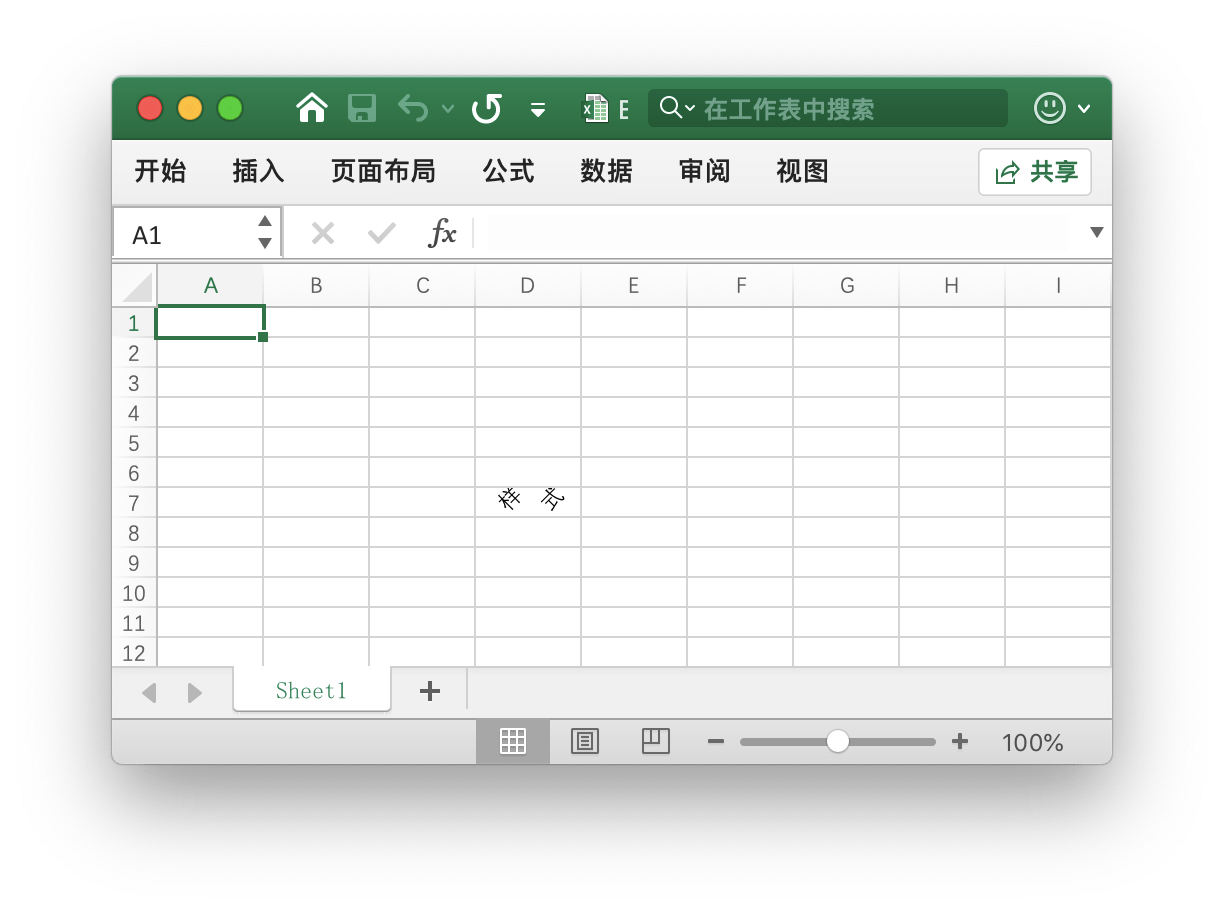
- 例4,为名为
Sheet1的工作表D7单元格设置字符间距与旋转角度:
f.SetCellValue("Sheet1", "D7", "样式")
style, err := f.NewStyle(&excelize.Style{
    Alignment: &excelize.Alignment{
        Horizontal:      "center",
        Indent:          1,
        JustifyLastLine: true,
        ReadingOrder:    0,
        RelativeIndent:  1,
        ShrinkToFit:     true,
        TextRotation:    45,
        Vertical:        "",
        WrapText:        true,
    },
})
if err != nil {
    fmt.Println(err)
}
err = f.SetCellStyle("Sheet1", "D7", "D7", style)
- 例5,Excel 中的日期和时间用实数表示,例如
2017/7/4 12:00:00 PM可以用数字42920.5来表示。为名为Sheet1的工作表D7单元格设置时间格式:
f.SetCellValue("Sheet1", "D7", 42920.5)
f.SetColWidth("Sheet1", "D", "D", 13)
style, err := f.NewStyle(&excelize.Style{NumFmt: 22})
if err != nil {
    fmt.Println(err)
}
err = f.SetCellStyle("Sheet1", "D7", "D7", style)
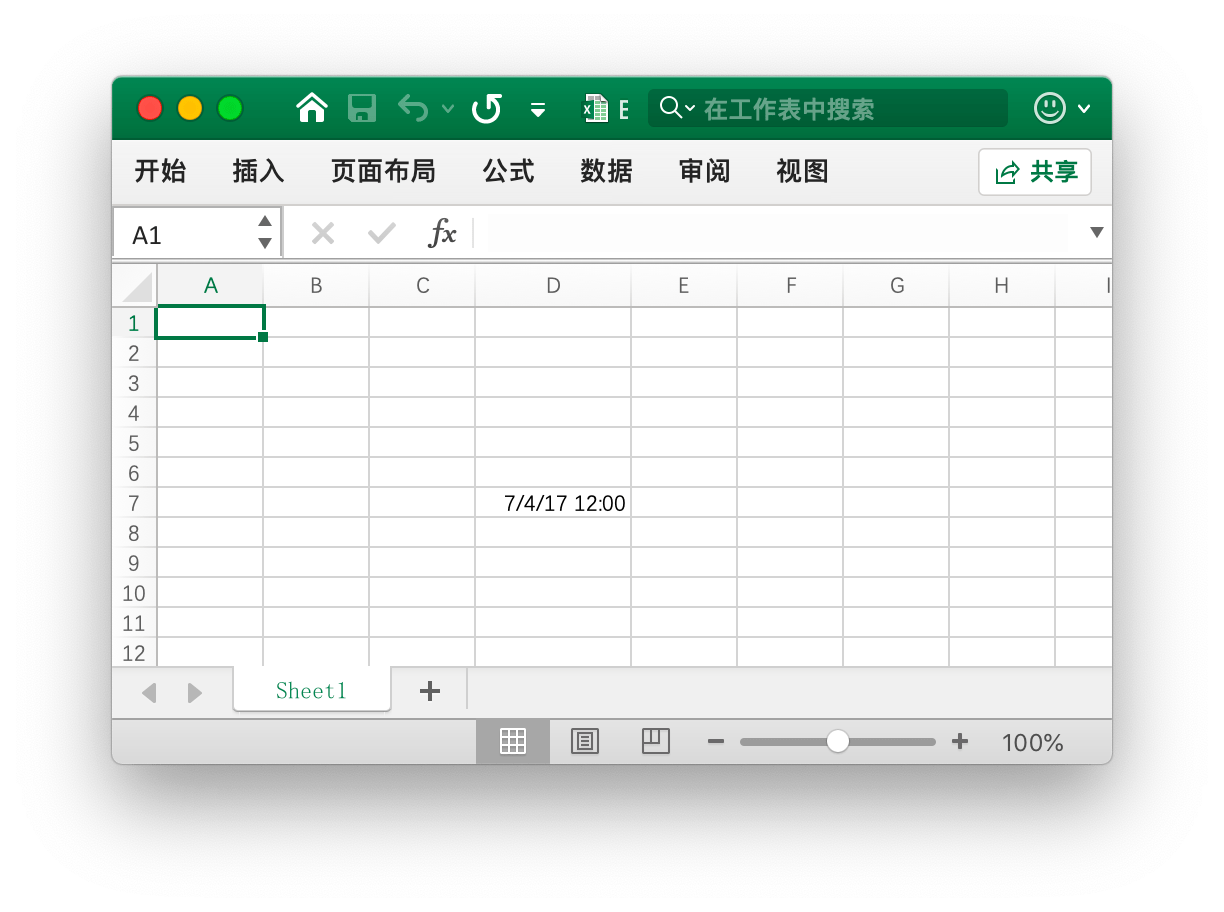
单元格 D7 被设置了时间格式。注意,当应用了时间格式的单元格宽度过窄无法完整展示时会显示为 ####,可以拖拽调整列宽或者通过调用 SetColWidth 函数设置列宽到合适的大小使其正常显示。
- 例6,为名为
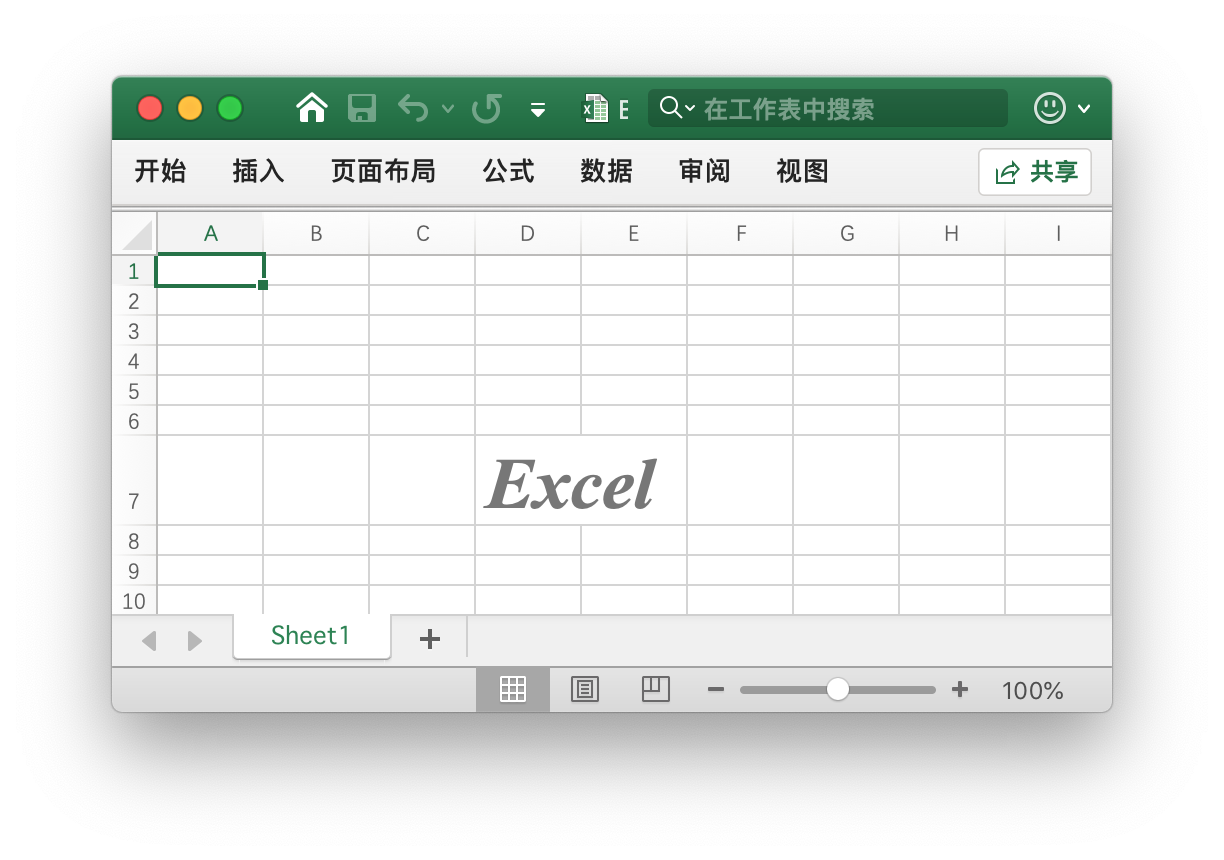
Sheet1的工作表D7单元格设置字体、字号、颜色和倾斜样式:
f.SetCellValue("Sheet1", "D7", "Excel")
style, err := f.NewStyle(&excelize.Style{
    Font: &excelize.Font{
        Bold:   true,
        Italic: true,
        Family: "Times New Roman",
        Size:   36,
        Color:  "777777",
    },
})
if err != nil {
    fmt.Println(err)
}
err = f.SetCellStyle("Sheet1", "D7", "D7", style)
- 例7,锁定并隐藏名为
Sheet1的工作表D7单元格:
style, err := f.NewStyle(&excelize.Style{
    Protection: &excelize.Protection{
        Hidden: true,
        Locked: true,
    },
})
if err != nil {
    fmt.Println(err)
}
err = f.SetCellStyle("Sheet1", "D7", "D7", style)
要锁定单元格或隐藏公式,请保护工作表。在“审阅”选项卡上,单击“保护工作表”。
设置超链接
func (f *File) SetCellHyperLink(sheet, cell, link, linkType string, opts ...HyperlinkOpts) error
根据给定的工作表、单元格坐标、链接资源和资源类型设置单元格的超链接。资源类型分为外部链接地址 External 和工作簿内部位置链接 Location 两种。每个工作表中的包含最大超链接限制为 65530 个。该方法仅设置单元格的超链接而不影响单元格的值,若需设置单元格的值,请通过 SetCellStyle 或 SetSheetRow 等函数另行设置。
- 例1,为名为
Sheet1的工作表A3单元格添加外部链接:
display, tooltip := "https://github.com/xuri/excelize", "Excelize on GitHub"
if err := f.SetCellHyperLink("Sheet1", "A3",
    "https://github.com/xuri/excelize", "External", excelize.HyperlinkOpts{
        Display: &display,
        Tooltip: &tooltip,
    }); err != nil {
    fmt.Println(err)
}
// 为单元格设置字体和下划线样式
style, err := f.NewStyle(&excelize.Style{
    Font: &excelize.Font{Color: "1265BE", Underline: "single"},
})
if err != nil {
    fmt.Println(err)
}
err = f.SetCellStyle("Sheet1", "A3", "A3", style)
- 例2,为名为
Sheet1的工作表A3单元格添加内部位置链接:
err := f.SetCellHyperLink("Sheet1", "A3", "Sheet1!A40", "Location")
设置富文本格式
func (f *File) SetCellRichText(sheet, cell string, runs []RichTextRun) error
根据给定的工作表、单元格坐标和富文本格式为指定单元格设置富文本。
例如,在名为 Sheet1 的工作表 A1 单元格设置富文本格式:

package main

import (
    "fmt"

    "github.com/xuri/excelize/v2"
)

func main() {
    f := excelize.NewFile()
    defer func() {
        if err := f.Close(); err != nil {
            fmt.Println(err)
        }
    }()
    if err := f.SetRowHeight("Sheet1", 1, 35); err != nil {
        fmt.Println(err)
        return
    }
    if err := f.SetColWidth("Sheet1", "A", "A", 44); err != nil {
        fmt.Println(err)
        return
    }
    if err := f.SetCellRichText("Sheet1", "A1", []excelize.RichTextRun{
        {
            Text: "bold",
            Font: &excelize.Font{
                Bold:   true,
                Color:  "2354E8",
                Family: "Times New Roman",
            },
        },
        {
            Text: " and ",
            Font: &excelize.Font{
                Family: "Times New Roman",
            },
        },
        {
            Text: "italic ",
            Font: &excelize.Font{
                Bold:   true,
                Color:  "E83723",
                Italic: true,
                Family: "Times New Roman",
            },
        },
        {
            Text: "text with color and font-family,",
            Font: &excelize.Font{
                Bold:   true,
                Color:  "2354E8",
                Family: "Times New Roman",
            },
        },
        {
            Text: "\r\nlarge text with ",
            Font: &excelize.Font{
                Size:  14,
                Color: "AD23E8",
            },
        },
        {
            Text: "strike",
            Font: &excelize.Font{
                Color:  "E89923",
                Strike: true,
            },
        },
        {
            Text: " superscript",
            Font: &excelize.Font{
                Color:     "DBC21F",
                VertAlign: "superscript",
            },
        },
        {
            Text: " and ",
            Font: &excelize.Font{
                Size:      14,
                Color:     "AD23E8",
                VertAlign: "baseline",
            },
        },
        {
            Text: "underline",
            Font: &excelize.Font{
                Color:     "23E833",
                Underline: "single",
            },
        },
        {
            Text: " subscript.",
            Font: &excelize.Font{
                Color:     "017505",
                VertAlign: "subscript",
            },
        },
    }); err != nil {
        fmt.Println(err)
        return
    }
    style, err := f.NewStyle(&excelize.Style{
        Alignment: &excelize.Alignment{
            WrapText: true,
        },
    })
    if err != nil {
        fmt.Println(err)
        return
    }
    if err := f.SetCellStyle("Sheet1", "A1", "A1", style); err != nil {
        fmt.Println(err)
        return
    }
    if err := f.SaveAs("Book1.xlsx"); err != nil {
        fmt.Println(err)
    }
}
获取富文本格式
func (f *File) GetCellRichText(sheet, cell string) ([]RichTextRun, error)
根据给定的工作表、单元格坐标获取指定单元格的富文本格式。
获取单元格的值
func (f *File) GetCellValue(sheet, cell string, opts ...Options) (string, error)
根据给定的工作表和单元格坐标获取单元格的值,返回值将转换为 string 类型。如果可以将单元格格式应用于单元格的值,将返回应用后的值,否则将返回原始值。合并区域内所有单元格的值都相同。此功能是并发安全的。
获取单元格数据类型
func (f *File) GetCellType(sheet, cell string) (CellType, error)
根据给定的工作表、单元格坐标获取指定单元格的数据类型。
按列获取全部单元格的值
func (f *File) GetCols(sheet string, opts ...Options) ([][]string, error)
根据给定的工作表名按列获取该工作表上全部单元格的值,以二维数组形式返回,其中单元格的值将转换为 string 类型。如果可以将单元格格式应用于单元格的值,将使用应用后的值,否则将使用原始值。
例如,按列获取并遍历输出名为 Sheet1 的工作表上的所有单元格的值:
cols, err := f.GetCols("Sheet1")
if err != nil {
    fmt.Println(err)
    return
}
for _, col := range cols {
    for _, rowCell := range col {
        fmt.Print(rowCell, "\t")
    }
    fmt.Println()
}
按行获取全部单元格的值
func (f *File) GetRows(sheet string, opts ...Options) ([][]string, error)
根据给定的工作表名按行获取该工作表上全部单元格的值,以二维数组形式返回,其中单元格的值将转换为 string 类型。如果可以将单元格格式应用于单元格的值,将使用应用后的值,否则将使用原始值。GetRows 获取带有值或公式单元格的行,行尾连续为空的单元格将被跳过,每行中的单元格数目可能不同。
例如,按行获取并遍历输出名为 Sheet1 的工作表上的所有单元格的值:
rows, err := f.GetRows("Sheet1")
if err != nil {
    fmt.Println(err)
    return
}
for _, row := range rows {
    for _, colCell := range row {
        fmt.Print(colCell, "\t")
    }
    fmt.Println()
}
获取超链接
func (f *File) GetCellHyperLink(sheet, cell string) (bool, string, error)
根据给定的工作表名和单元格坐标获取单元格超链接,如果该单元格存在超链接,将返回 true 和链接地址,否则将返回 false 和空的链接地址。
例如,获取名为 Sheet1 的工作表上坐标为 H6 单元格的超链接:
link, target, err := f.GetCellHyperLink("Sheet1", "H6")
获取样式索引
func (f *File) GetCellStyle(sheet, cell string) (int, error)
根据给定的工作表名和单元格坐标获取单元格样式索引,获取到的索引可以在设置单元格样式时,作为调用 SetCellStyle 函数的参数使用。
合并单元格
func (f *File) MergeCell(sheet, hCell, vCell string) error
根据给定的工作表名和单元格坐标区域合并单元格。合并区域内仅保留左上角单元格的值,其他单元格的值将被忽略。例如,合并名为 Sheet1 的工作表上 D3:E9 区域内的单元格:
err := f.MergeCell("Sheet1", "D3", "E9")
如果给定的单元格坐标区域与已有的其他合并单元格相重叠,已有的合并单元格将会被删除。
取消合并单元格
func (f *File) UnmergeCell(sheet string, hCell, vCell string) error
根据给定的工作表名和单元格坐标区域取消合并单元格。例如,取消合并名为 Sheet1 的工作表上 D3:E9 区域内的单元格:
err := f.UnmergeCell("Sheet1", "D3", "E9")
如果给定的单元格坐标区域包含多个合并单元格,则全部合并单元格都将被取消合并。
获取合并单元格
根据给定的工作表名获取全部合并单元格的坐标区域和值。
func (f *File) GetMergeCells(sheet string) ([]MergeCell, error)
获取合并单元格的值
func (m *MergeCell) GetCellValue() string
GetCellValue 返回合并单元格的值。
获取合并单元格区域左上角单元格坐标
func (m *MergeCell) GetStartAxis() string
GetStartAxis 返回合并单元格区域左上角单元格的坐标,例如:C2。
获取合并单元格区域右下角单元格坐标
func (m *MergeCell) GetEndAxis() string
GetEndAxis 返回合并单元格区域右下角单元格的坐标,例如:D4。
添加批注
func (f *File) AddComment(sheet string, comment Comment) error
根据给定的工作表名称、单元格坐标和样式参数(作者与文本信息)添加批注。作者信息最大长度为 255 个字符,最大文本内容长度为 32512 个字符,超出该范围的字符将会被忽略。例如,为 Sheet1!$A$3 单元格添加批注:
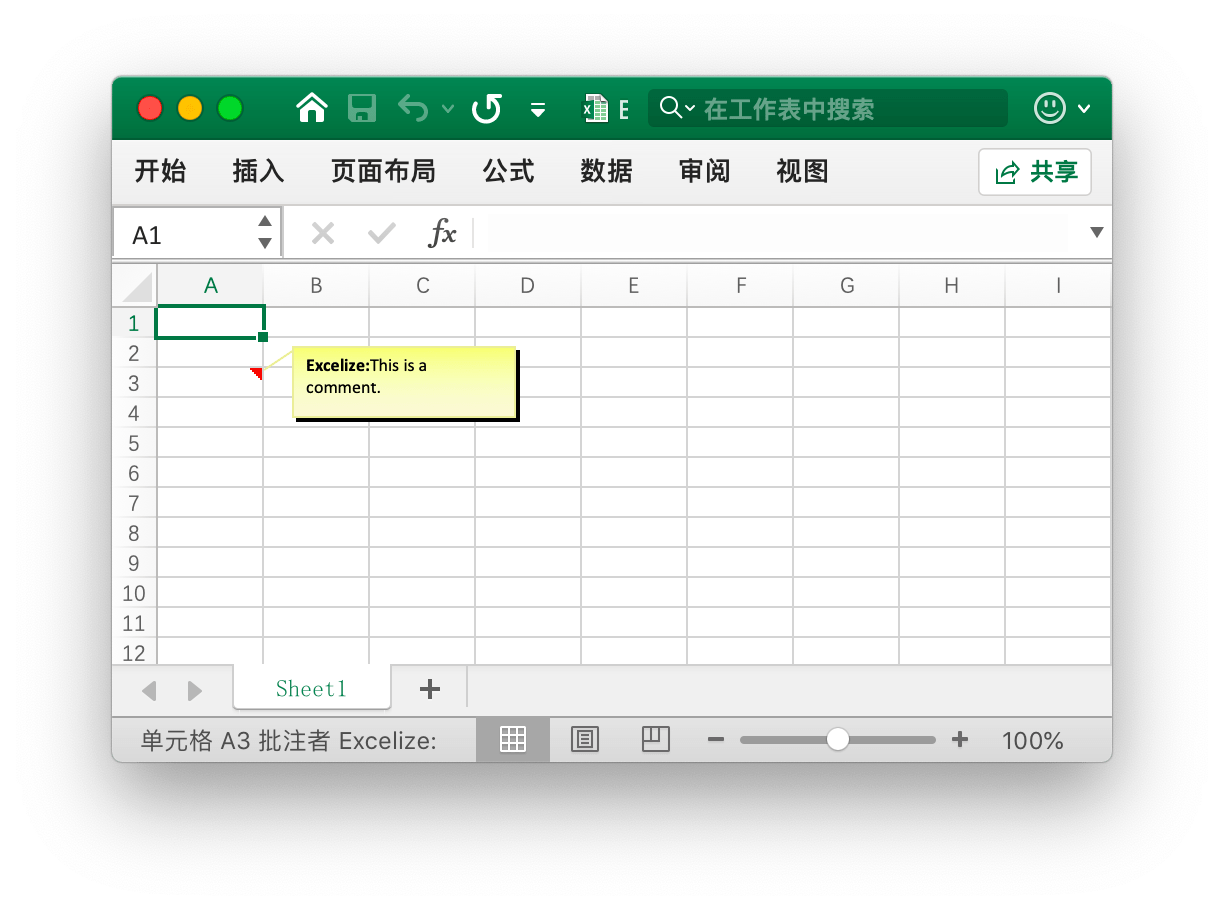
err := f.AddComment("Sheet1", excelize.Comment{
    Cell:   "A3",
    Author: "Excelize",
    Paragraph: []excelize.RichTextRun{
        {Text: "Excelize: ", Font: &excelize.Font{Bold: true}},
        {Text: "This is a comment."},
    },
})
获取批注
func (f *File) GetComments(sheet string) ([]Comment, error)
根据给定的工作表名称获取工作表中的所有单元格批注。
删除批注
func (f *File) DeleteComment(sheet, cell string) error
根据给定的工作表名称、单元格坐标删除批注。例如,删除 Sheet1!$A$30 单元格批注:
err := f.DeleteComment("Sheet1", "A30")