1.介绍
ChatGPT插件,就一种扩展ChatGPT对话能力的方式,例如:我们在跟ChatGPT聊天的时候,让ChatGPT帮我们买电影票、订酒店、点外卖等。是不是很强大,要使用插件功能,你需要在ChatGPT插件应用市场安装需要的插件,不同的插件有不同的功能。
ChatGPT在对话过程中会分析对话内容,在合适的时候会自动调用插件提供的API,实现各种各样的功能。
例如:
我们开发一个点外卖的插件,这个插件开放了一个查询菜品和下单的接口。我们把插件上架到ChatGPT应用市场,当用户安装了插件后。
当用户在ChatGPT对话过程中,提到“我肚子饿了,帮我找找好吃的”,“今天中午吃什么?”,“帮我点个外卖”等,ChatGPT会自动调用外卖插件,菜品查询接口询问,客户你要点什么?最后调用下单接口,自动下单。
提示:你可能会有疑问,ChatGPT怎么知道要调用那个插件,调用插件的那个API,这个是因为插件和API接口包括参数,都有对应的描述信息,ChatGPT通过这些信息理解插件的功能和接口的含义。
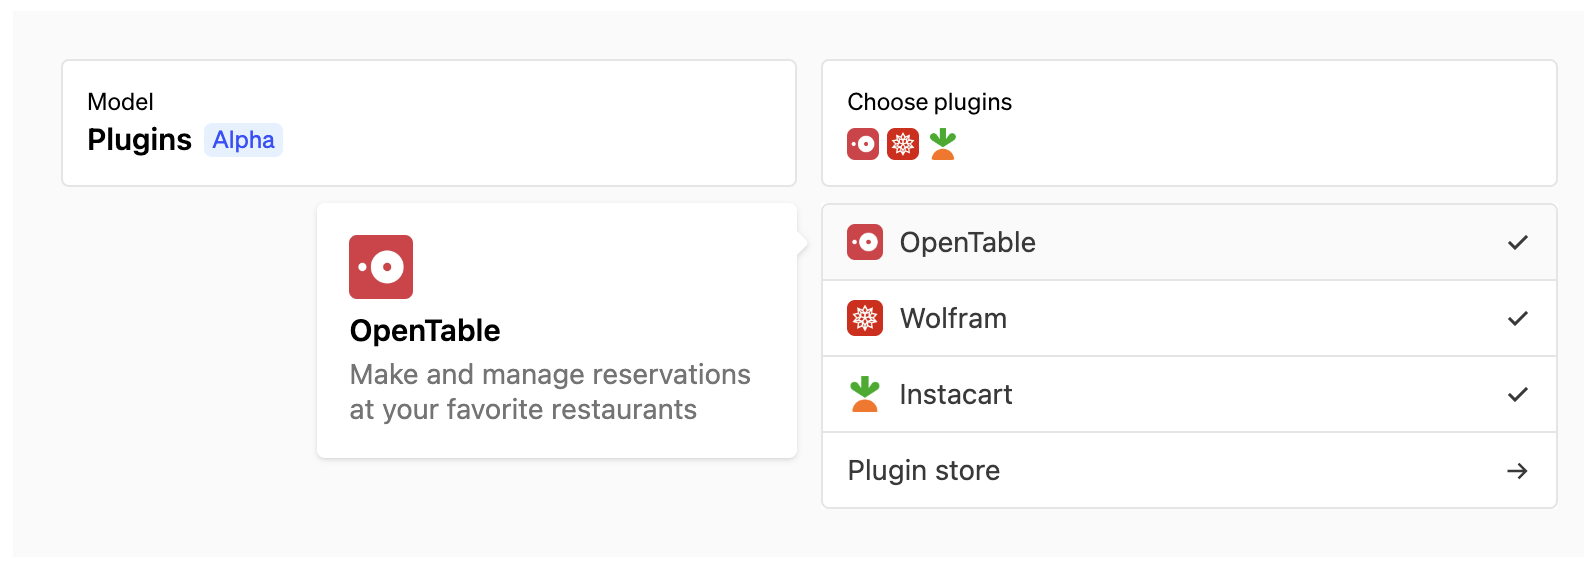
ChatGPT插件安装示意图:
ChatGPT调用插件生成代码完成计算的例子:
2.ChatGPT插件开发流程
目前ChatGPT插件主要面向后端,只要开发好API,然后写一下插件配置和API接口文档就可以完成插件开发。
开发一个插件主要就3个步骤:
- 开发API(没有什么特别的,跟普通的API一样)
- 写API文档(OpenAPI格式,就是Swagger生成的API文档)
- 编写manifest插件配置文件
说明:开发一个ChatGPT插件很简单,对于已经有成熟系统,API文档也是使用Swagger的情况,只要编写下manifest插件配置文件就可以。
3.插件配置(manifest)
插件配置文件(ai-plugin.json),就是告诉ChatGPT,我们插件的功能是什么,API文档在哪里。
每一个插件都有一个ai-plugin.json配置文件,如果你的域名是 https://example.com ,ChatGPT会去这个路径查询插件配置 https://example.com/.well-known/ai-plugin.json
提示:/.well-known/ai-plugin.json ChatGPT插件配置文件固定路径
插件配置(ai-plugin.json)例子
{
  "schema_version": "v1",
  "name_for_human": "插件名字,给用户看的名字",
  "name_for_model": "插件名字,给ChatGPT模型看的名字",
  "description_for_human": "插件功能描述,给ChatGPT用户看的",
  "description_for_model": "插件功能描述,给ChatGPT模型看的",
  "auth": {
    "type": "none"
  },
  "api": {
    "type": "openapi",
    "url": "https://example.com/openapi.yaml",
    "is_user_authenticated": false
  },
  "logo_url": "https://example.com/logo.png",
  "contact_email": "support@example.com",
  "legal_info_url": "http://www.example.com/legal"
}
参数说明:
| 字段 | 类型 | 说明 |
|---|---|---|
| schema_version | String | 配置文件版本 |
| name_for_human | String | 插件名字,给用户看的名字,就是显示在插件应用市场上面的名字 |
| name_for_model | String | 插件名字,给ChatGPT模型看的名字,需要唯一,例如: waimai |
| description_for_model | String | 描述插件的功能,ChatGPT会分析这个字段,确定什么时候调用你的插件 |
| description_for_human | String | 描述插件的功能,这个字段是在插件市场展示给用户看的 |
| api.url | String | 这个是swagger api文档地址,chatgpt通过这个地址访问我们的api文档 |
| auth.type | String | 这个是API认证方式,none 代表不需要认证,后面单独介绍API认证机制 |
| logo_url | String | 插件logo地址 |
| contact_email | String | 插件官方联系邮件 |
| legal_info_url | String | 插件官方地址 |
4.API接口文档描述
ChatGPT插件规范要求,插件的API文档以OpenAPI规范描述,如果你使用过Swagger管理API就很熟悉了,Swagger生成的文档就是符合OpenAPI规范。
例子:
openapi: 3.0.1
info:
  title: TODO Plugin
  description: 允许用户使用 ChatGPT 创建和管理 TODO 列表的插件。 如果您不知道用户的用户名,请在查询插件之前先询问他们。 否则,使用用户名“global”。
  version: 'v1'
servers:
  - url: PLUGIN_HOSTNAME
paths:
  /todos/{username}:
    get:
      operationId: getTodos
      summary: 获取待办事项列表
      parameters:
      - in: path
        name: username
        schema:
            type: string
        required: true
        description: 用户的名称。
      responses:
        "200":
          description: OK
          content:
            application/json:
              schema:
                $ref: '#/components/schemas/getTodosResponse'
    post:
      operationId: addTodo
      summary: 将待办事项添加到列表
      parameters:
      - in: path
        name: username
        schema:
            type: string
        required: true
        description: 用户的名称。
      requestBody:
        required: true
        content:
          application/json:
            schema:
              $ref: '#/components/schemas/addTodoRequest'
      responses:
        "200":
          description: OK
    delete:
      operationId: deleteTodo
      summary: 从列表中删除待办事项
      parameters:
      - in: path
        name: username
        schema:
            type: string
        required: true
        description: 用户名
      requestBody:
        required: true
        content:
          application/json:
            schema:
              $ref: '#/components/schemas/deleteTodoRequest'
      responses:
        "200":
          description: OK

components:
  schemas:
    getTodosResponse:
      type: object
      properties:
        todos:
          type: array
          items:
            type: string
          description: 待办事项列表。
    addTodoRequest:
      type: object
      required:
      - todo
      properties:
        todo:
          type: string
          description: 要添加到列表中的待办事项。
          required: true
    deleteTodoRequest:
      type: object
      required:
      - todo_idx
      properties:
        todo_idx:
          type: integer
          description: 要删除的待办事项的索引。
          required: true
提示:OpenAPI的api文档配置不用刻意去记忆,根据你自己的开发语言,使用Swagger写文档会自动生成,关键是要把每个API的功能和参数描述清楚,让ChatGPT知道是干什么的
5.API认证机制
5.1.无需认证
这样配置即可
"auth": {
  "type": "none"
}
5.2.服务层面的Token校验
配置格式:
"auth": {
  "type": "service_http",
  "authorization_type": "bearer",
  "verification_tokens": {
    "openai": "cb7cdfb8a57e45bc8ad7dea5bc2f8324"
  }
},
这种方式,就是chatgpt调用你的API的时候,会在请求头,增加Authorization认证参数,把上面配置的token传回给你,你校验下就行。
5.3.用户层面的Token校验
配置如下
"auth": {
  "type": "user_http",
  "authorization_type": "bearer",
},
这种方式,跟5.2的区别就是,用户在安装插件的时候,需要跟你申请token,然后用token激活插件,感觉这就是一种激活码,ChatGPT调用API的时候跟5.2一样,在请求头把用户填写的token传回给你校验。
5.4.Oauth认证
配置如下
"auth": {
  "type": "oauth",
  "client_url": "https://my_server.com/authorize",
  "scope": "",
  "authorization_url": "https://my_server.com/token",
  "authorization_content_type": "application/json",
  "verification_tokens": {
    "openai": "abc123456"
  }
},
参数说明:
- verification_tokens 配置clientid和secret,格式 “clientid”: “secret”
- client_url 授权地址,会调转到这个地址完成登录授权
- authorization_url 授权成功后,chatgpt会调用这个接口查询认证信息
这种方式,类似微信登录,用户在安装插件的时候,先跳转回你的网站授权,授权成功后,跳回chatgpt,后续chatgpt调用api的时候会在请求头携带token,参数类似5.2章节描述的。